
Keepsake boxes might seem like simple wooden containers, but their impact goes way beyond storage. Picture this. Luxury brands have seen customized keepsake boxes increase client retention by up to 30 percent. So why do so many DIY creators and businesses rush the process or stick to generic designs? The biggest value comes from craftsmanship and creative personalization, turning even the most basic box into a lasting memory or a standout business gift.
Table of Contents
- Choosing The Right Materials And Tools
- Step-By-Step Process For Making A Keepsake Box
- Creative Decorating Ideas For Keepsake Boxes
- Practical Uses For Keepsake Boxes In Home And Business
Quick Summary
| Takeaway | Explanation |
|---|---|
| Choose quality hardwoods for durability | Select woods like maple, walnut, or cherry for their strength and elegant aging. Their properties enhance both the box’s appearance and longevity. |
| Prepare your workspace for efficiency | An organized workspace minimizes errors and maximizes productivity, ensuring a smoother crafting process. Collect all materials and tools before starting. |
| Invest in essential tools for precision | Use measuring, cutting, and joining tools to achieve clean edges and strong connections. Quality tools enhance your crafting experience and final product. |
| Personalize with meaningful decorations | Add textiles, engravings, or symbolic colors to make your keepsake box uniquely yours, transforming it into a narrative container of memories. |
| Utilize keepsake boxes for various purposes | They serve as elegant storage for personal items at home and functional organizational tools in business settings, enhancing both aesthetics and utility. |
Choosing the Right Materials and Tools
Creating a beautiful and durable keepsake box requires careful selection of materials and tools. Your project’s success depends on understanding the right components and how they work together to produce a stunning final product.
Wood Selection: The Foundation of Your Keepsake Box
Wood is the primary material for crafting a keepsake box, and choosing the right type makes a significant difference. According to Fine Woodworking, hardwoods like maple, walnut, and cherry offer durability and aesthetic appeal. These woods not only withstand wear and tear but also develop a rich patina over time.
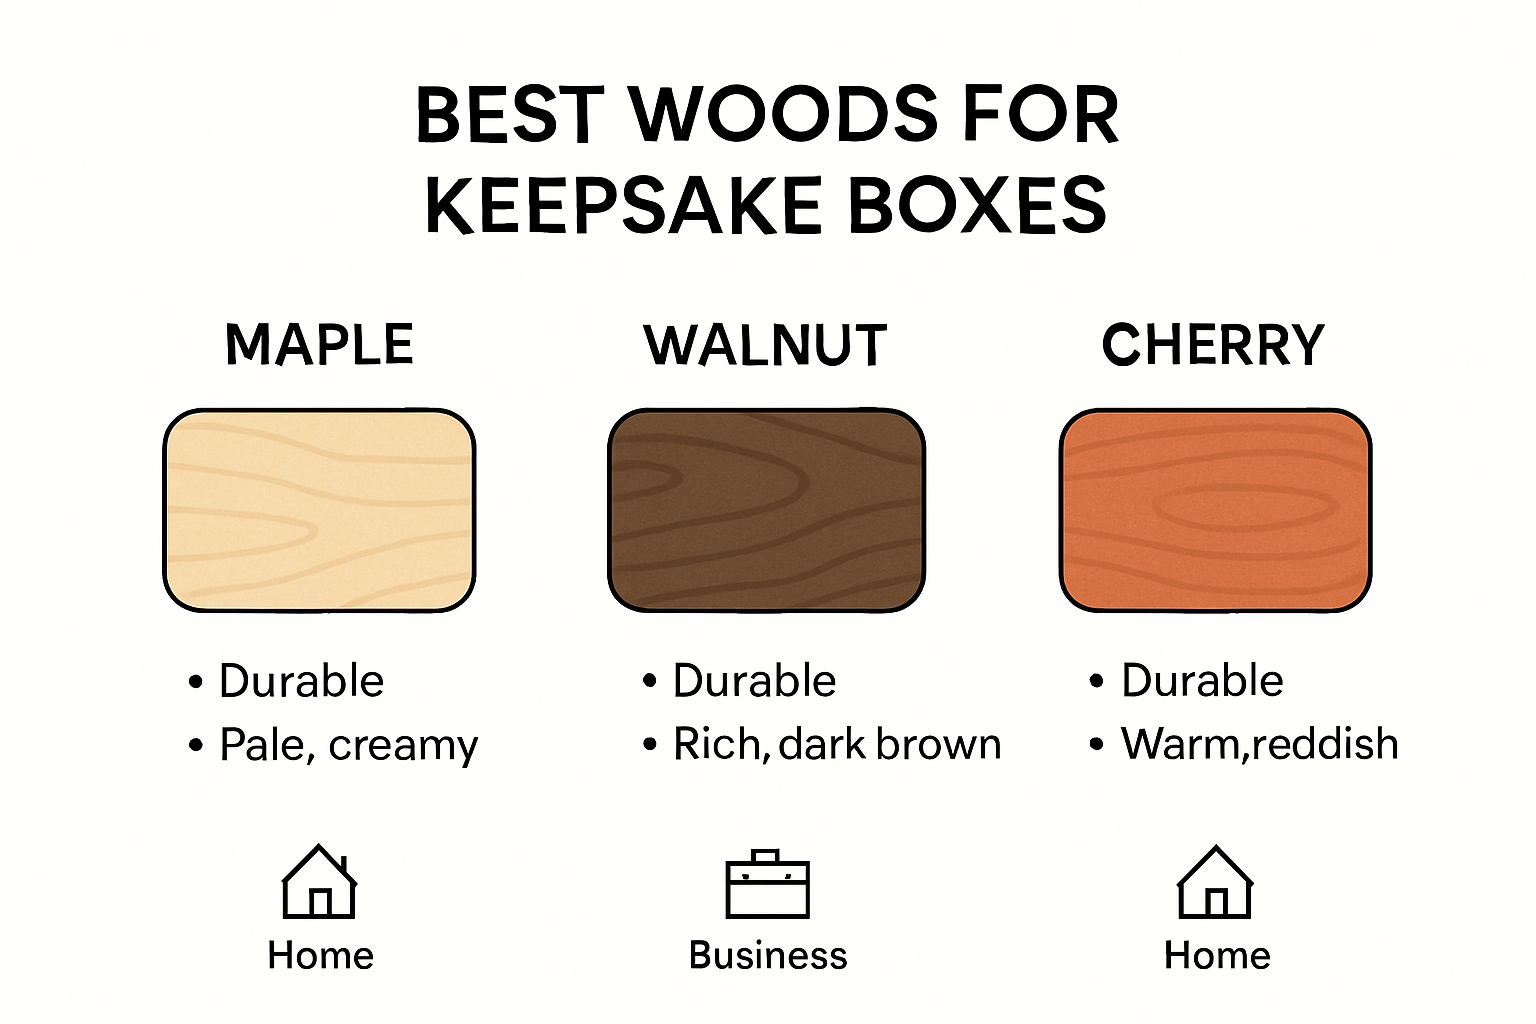
Each wood type brings unique characteristics to your project. Maple provides a smooth, light surface perfect for intricate designs. Walnut offers deep, rich tones that create a sophisticated look. Cherry wood ages beautifully, developing a warm reddish-brown hue that adds elegance to your keepsake box.
To help you choose the ideal wood for your keepsake box, here’s a comparison table summarizing the unique features of maple, walnut, and cherry as discussed above.
| Wood Type | Appearance | Durability | Special Characteristics |
|---|---|---|---|
| Maple | Smooth, light surface | High | Ideal for intricate designs |
| Walnut | Deep, rich dark tones | High | Creates a sophisticated, elegant look |
| Cherry | Warm, reddish-brown hue | High, improves | Ages beautifully, develops rich patina |
Essential Tools for Precision Crafting
To transform raw materials into a professional keepsake box, you’ll need a specific set of tools. Popular Woodworking recommends the following essential equipment:
- Measuring Tools: Precision is key. A quality metal ruler, combination square, and marking gauge ensure accurate cuts and alignments.
- Cutting Tools: A sharp handsaw or table saw, along with chisels of varying sizes, will help you create clean, precise edges.
- Joining Tools: Wood glue, clamps, and a mallet are crucial for creating strong, seamless connections between wood pieces.
Investing in high-quality tools might seem expensive initially, but they dramatically improve your crafting experience and final product quality. Professional-grade tools provide cleaner cuts, more accurate measurements, and ultimately, a more polished keepsake box.
Additional Materials for Finishing and Personalization
Beyond wood and basic tools, consider additional materials that elevate your keepsake box. Felt or velvet lining adds a luxurious interior touch. Decorative hinges, clasps, and wood stains or varnishes allow for personalization and protection.
When selecting finishing materials, prioritize those that complement your wood choice. A clear polyurethane varnish can enhance the wood’s natural grain, while colored stains can match specific decor styles or personal preferences.
Remember that creating a keepsake box is both a technical and artistic process. Your material and tool choices reflect your craftsmanship and personal style. Take time to research, select quality components, and enjoy the creative journey of transforming simple materials into a treasured item that will preserve memories for years to come.
Step-by-Step Process for Making a Keepsake Box
Crafting a keepsake box requires patience, precision, and a systematic approach. This guide will walk you through the essential steps to transform raw materials into a personalized storage solution that preserves memories and reflects your creative vision.
Preparing Your Workspace and Materials
Before beginning your project, preparation is crucial. According to Woodworkers Journal, setting up a clean, organized workspace increases efficiency and reduces potential errors. Gather all your selected materials and tools in advance, including your chosen wood, measuring tools, cutting implements, and finishing supplies.
Lay out a protective work surface such as a large cutting mat or sturdy workbench. Ensure you have adequate lighting and ventilation. Wear safety glasses and work gloves to protect yourself during the crafting process. Organize your tools within easy reach to maintain a smooth workflow.
Cutting and Assembling the Box Structure
Precision is paramount when cutting wood for your keepsake box. Fine Woodworking recommends measuring twice and cutting once to minimize material waste. Begin by marking your wood pieces carefully using a combination square and marking gauge.
Cut your wood pieces to the desired dimensions for the box bottom, sides, and lid. Use a table saw or handsaw for clean, straight cuts. Sand each piece thoroughly to remove any rough edges or splinters. For joining the box sides, consider using techniques like:
- Dovetail Joints: Create interlocking corner connections for maximum strength
- Rabbet Joints: Simple yet effective method for connecting side pieces
- Mitered Corners: Provide a clean, seamless appearance
Apply wood glue to your joining points and use clamps to hold pieces together while the adhesive sets. Allow sufficient drying time according to the glue manufacturer’s instructions.
Finishing and Personalizing Your Keepsake Box
The final stage transforms your basic wooden structure into a personalized treasure. Sand the entire box surface progressively, starting with coarse-grit sandpaper and moving to finer grits for a smooth finish. Wipe away any dust with a tack cloth.
Choose a finishing technique that enhances your wood’s natural beauty. Options include wood stains, clear varnish, or painted surfaces. For added protection, apply multiple thin coats of polyurethane, allowing each layer to dry completely. You might also consider adding personal touches like:
- Interior fabric lining
- Decorative metal hardware
- Carved or pyrography designs
- Custom engraving
Let your creativity guide the personalization process. Each detail you add makes the keepsake box uniquely yours, transforming it from a simple wooden container into a meaningful storage piece that tells a story.
Remember that crafting a keepsake box is a journey of creativity and skill. Take your time, enjoy the process, and don’t be afraid to learn from any mistakes along the way. Your patience and attention to detail will result in a beautiful, lasting item that can preserve memories for generations.
Below is a process table outlining each major step for making a keepsake box, along with a brief description to guide you through the project.
| Step | Description |
|---|---|
| Prepare Workspace & Materials | Organize tools, materials, and ensure clean, well-lit, and safe environment |
| Cut Wood Pieces | Measure wood, mark lines, then use saws to cut sides, bottom, and lid to desired dimensions |
| Sand Edges | Smooth all edges with progressively finer sandpaper for safe and polished look |
| Assemble & Join Box Structure | Use dovetail, rabbet, or mitered joints; glue and clamp until fully set |
| Apply Finishing | Sand again if needed, then apply stain, varnish, or paint for desired appearance |
| Add Personalization | Decorate box with lining, hardware, engravings, or special artistic elements as desired |
Creative Decorating Ideas for Keepsake Boxes
Transforming a keepsake box from a simple wooden container into a personalized masterpiece requires creativity, imagination, and thoughtful design. The right decorative approach can turn your box into a meaningful piece that tells a story and captures cherished memories.
Painting and Staining Techniques
Hallmark Ideas & Inspiration suggests exploring diverse painting and staining methods to add character to your keepsake box. Watercolor washes can create soft, ethereal backgrounds, while acrylic paints offer bold, vibrant color options. Techniques like ombré shading, distressed painting, and metallic accents can dramatically enhance your box’s visual appeal.
Consider using stencils to create intricate patterns or geometric designs. Wood burning techniques can add elegant, personalized details like names, dates, or meaningful quotes. Experiment with color combinations that complement your home decor or reflect personal style preferences.
Decorative Elements and Embellishments
According to Archeworks, incorporating meaningful personal elements can transform your keepsake box into a deeply sentimental item. Consider these creative embellishment ideas:
- Photographic Memories: Transfer family photographs onto the box surface using special transfer paper
- Natural Elements: Embed pressed flowers, seashells, or small meaningful objects into the box design
- Fabric Accents: Use fabric from significant events like wedding dresses or baby blankets to create unique decorative panels
Decorative hardware like vintage buttons, antique clasps, or custom-designed metal corners can add sophistication and personal flair. Decoupage techniques allow you to incorporate newspaper clippings, sheet music, or travel mementos directly into the box’s design.
Personalization and Emotional Storytelling
The most powerful keepsake boxes are those that tell a personal narrative. Archeworks recommends focusing on storytelling through design. Create a timeline of memories, use symbolic colors representing significant life moments, or design themed sections that chronicle different life stages.
Consider adding hidden compartments with handwritten notes, creating a multi-layered experience for anyone who opens the box. Incorporate elements that spark joy and reflection. Perhaps use colors from a favorite childhood memory or include small trinkets that represent personal achievements.
Remember that decorating a keepsake box is an intimate, creative process. There are no strict rules. Allow your emotions and personal experiences to guide your design choices. Each brushstroke, embellishment, and carefully chosen detail contributes to creating a unique artifact that preserves not just objects, but the stories and emotions connected to them.
Ultimately, your keepsake box should be a reflection of your journey a tangible representation of memories that matter most to you. Approach the decorating process with patience, creativity, and an open heart.
Practical Uses for Keepsake Boxes in Home and Business
Keepsake boxes are far more than simple storage containers. They serve as versatile organizational tools, memory preservers, and decorative elements that can enhance both personal living spaces and professional environments.
Home Organization and Personal Memory Preservation
The Humble Hare highlights the incredible versatility of keepsake boxes across different home spaces. In the bedroom, these boxes can transform jewelry storage from chaotic to elegant. Create dedicated compartments for earrings, necklaces, and precious accessories, keeping them protected and beautifully displayed.
Living rooms and home offices benefit from keepsake boxes as stylish organizational solutions. Use them to store important documents, receipts, family photographs, or collections of meaningful items like travel souvenirs or inherited mementos. Their compact design allows them to blend seamlessly with existing decor while providing practical storage.
Business and Professional Applications
In professional settings, keepsake boxes offer unique organizational and branding opportunities. Golden Coil suggests multiple business uses, such as:
- Client Gift Packaging: Create custom branded keepsake boxes for client gifts or promotional materials
- Office Supply Storage: Organize small office essentials like USB drives, business cards, and presentation materials
- Project Memory Archiving: Store project documentation, milestone commemorations, and team achievement mementos
Real estate professionals might use personalized keepsake boxes as closing gifts, adding a memorable touch to client relationships. Consultants could design boxes that showcase their brand’s aesthetic while providing practical value to clients.
Creative Display and Gifting Strategies
Pickup Please recommends innovative approaches to displaying and utilizing keepsake boxes. Consider these creative strategies:
- Design boxes with clear lids to showcase meaningful items without constant handling
- Create themed boxes for specific life events like weddings, graduations, or family reunions
- Use modular box designs that can be stacked or connected for expandable storage
For personal gifting, a handcrafted keepsake box becomes more than a present it becomes a cherished memory vessel. Fill it with handwritten notes, small treasured items, or create a curated collection that tells a story.
Remember that a well-designed keepsake box transcends its physical form. It becomes a narrative container, preserving memories, organizing spaces, and connecting personal and professional worlds through thoughtful design and purposeful use.
Whether used in a cozy home corner or a sleek office environment, keepsake boxes offer a perfect blend of functionality and emotional significance. They represent more than storage they are guardians of our most precious moments and organizational tools that reflect our unique stories.
Frequently Asked Questions
What are the best types of wood for making a keepsake box?
Hardwoods like maple, walnut, and cherry are ideal for keepsake boxes due to their durability and elegant appearance. Each type offers unique aesthetic qualities and enhances the box’s longevity.
What tools are essential for crafting a keepsake box?
Essential tools include measuring tools (like a metal ruler and combination square), cutting tools (such as a handsaw or table saw), and joining tools (wood glue, clamps, and a mallet) to ensure precise crafting and strong connections.
How can I personalize my keepsake box?
You can personalize your keepsake box by adding unique decorations such as engravings, painted designs, or fabric linings. Incorporating meaningful colors or symbols can also turn the box into a narrative container of memories.
What are some practical uses for keepsake boxes in a business setting?
Keepsake boxes can be used in business for client gift packaging, organizing office supplies, or archiving project memories. They can enhance branding and create memorable experiences for clients.
Turn Your Keepsake Box Vision into Reality With CustomCraft UA
Have you ever struggled to create a keepsake box that truly captures your story or your brand’s spirit? This article highlights common frustrations like limited personalization, difficulty in choosing quality materials, and the challenge of blending creative ideas with craftsmanship for both home and business uses. Imagine how effortless and rewarding it would feel to bring your unique ideas to life with guidance from seasoned artisans.
At CustomCraft UA, your creativity meets our expertise. Whether you want a box that protects cherished memories or a one-of-a-kind business gift that strengthens client relationships, our team is ready to help. Experience the difference of real craftsmanship and modern precision as we transform your inspiration into a tangible keepsake worthy of your story. Contact us today through our main page here and let’s start customizing your perfect piece. Do not wait the memories you want to keep safe deserve a box designed just for them.


