
Wooden art is taking over homes and social feeds in ways nobody saw coming. Whether you’re a beginner or a longtime craft enthusiast, the appeal is hard to ignore when you learn that over 70 percent of homeowners say handmade wood decor adds more warmth and personality than store-bought pieces. Most people think you need a big workshop or fancy tools to get started. Surprise, all it takes is a little guidance and the right ideas to turn even simple wood scraps into art you’ll be proud to show off.
Table of Contents
- Choosing The Right Wood And Tools
- Simple Wooden Art Ideas For Home And Kitchen
- Step-By-Step Guide To Creating Wooden Wall Art
- Tips For Selling Your Wooden Art Online
Quick Summary
| Takeaway | Explanation |
|---|---|
| Choose the right wood type | Different woods affect workability and final appearance, so select accordingly. Hardwoods like oak are durable, while softwoods are economical for beginners. |
| Master essential woodworking tools | Invest in quality tools such as chisels and saws to improve precision and safety in your projects. Proper maintenance is crucial for effective woodworking. |
| Plan your wooden wall art design | Begin with sketches to visualize your idea and choose appropriate wood types based on your concept and desired aesthetics. |
| Create professional product photos | High-quality images attract potential buyers and showcase your art effectively. Use good lighting and neutral backgrounds for clarity. |
| Understand pricing and marketing | Determine costs and research the market to price your art competitively. Consistent branding and customization options can enhance appeal. |
Choosing the Right Wood and Tools
Creating stunning wooden art requires understanding the nuanced world of materials and equipment. Your success depends on selecting appropriate wood types and mastering the right tools for your specific project.
Understanding Wood Selection
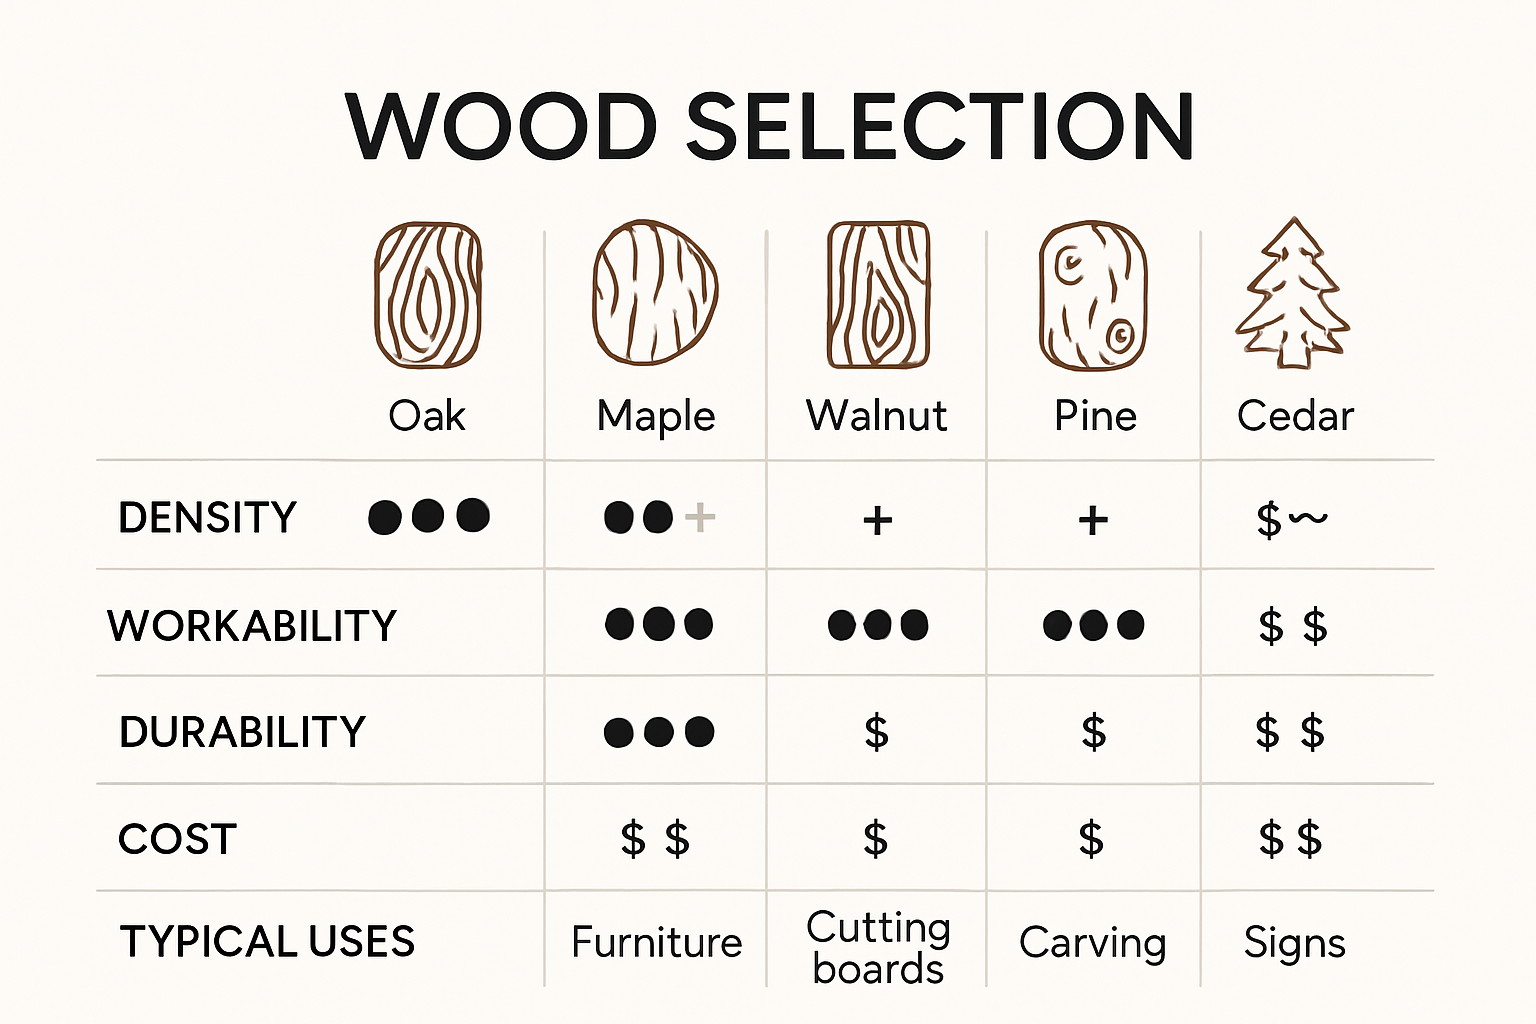
Wood selection is a critical foundation for any wooden art project. Different wood types offer unique characteristics that dramatically impact your final creation. Research from the University of Oregon’s College of Design highlights the importance of understanding wood’s workability, grain quality, and durability.
Hardwoods like oak, maple, and walnut provide exceptional strength and beautiful grain patterns ideal for intricate art pieces. These woods are dense, offering remarkable detail retention and long-lasting durability. Softwoods such as pine and cedar, conversely, are more affordable and easier to manipulate, making them excellent choices for beginners exploring wooden art techniques.
Consider the wood’s grain direction carefully. According to woodworking experts, straight and even grain facilitates stronger glued joints and prevents splitting during carving or cutting. When working on projects exposed to moisture, select wood with natural rot-resistant properties to ensure your artwork maintains its integrity over time.
Here’s a comparison table to help you choose which type of wood is best suited for your wooden art project, summarizing the pros and cons of commonly mentioned woods in the article.
| Wood Type | Ease of Use | Durability | Ideal For | Cost |
|---|---|---|---|---|
| Oak | Medium | High | Intricate art pieces and long-lasting decor | $$$ |
| Maple | Medium | High | Cutting boards, detailed carvings | $$$ |
| Walnut | Difficult | High | Decorative wall art, premium projects | $$$$ |
| Pine | Easy | Moderate | Beginner projects, modern bright designs | $ |
| Cedar | Easy | Moderate | Projects exposed to moisture, rustic decor | $$ |
| Cherry | Medium | High | Cutting boards, detailed work | $$$$ |
Essential Woodworking Tools
Equipping yourself with the right tools transforms potential challenges into creative opportunities. Basic woodworking tools every aspiring wooden art creator should consider include:
- Chisels: Precision cutting and detailed carving require high-quality chisels with varied tip shapes
- Hand Saws: For accurate cutting and shaping of wood pieces
- Gouges: Curved tools perfect for creating intricate designs and removing wood material
- Measuring Tools: Rulers, squares, and calipers ensure accurate dimensions
When selecting tools, prioritize quality over quantity. Invest in well-crafted tools that provide comfortable grip, durability, and precision. Wood carving techniques suggest using tools with appropriate bevel angles matching your wood’s hardness. Harder woods might require gouges with stronger 35-degree bevels and robust mallets.
Safety remains paramount in woodworking. Always wear protective eyewear, use dust masks, and maintain a clean, organized workspace. Keep your tools sharp and well-maintained, as dull tools increase the risk of accidents and produce lower-quality results.
Understanding wood characteristics and mastering tool techniques will elevate your wooden art from simple crafts to extraordinary expressions of creativity. Take time to experiment, practice, and develop your unique artistic voice through careful material and tool selection.
Simple Wooden Art Ideas for Home and Kitchen
Transforming your living space with wooden art doesn’t require advanced skills or expensive materials. With creativity and basic woodworking techniques, you can craft stunning pieces that add warmth and personality to your home and kitchen.
Functional Wooden Decor for Kitchen Spaces
Better Homes & Gardens suggests starting with practical wooden projects that blend utility and aesthetics. A ladder-style shelf offers an excellent entry point for beginners. This versatile piece can display cookbooks, potted herbs, or decorative kitchen items while adding architectural interest to your space.
Consider creating wooden cutting boards with personalized engravings or unique geometric designs. These functional art pieces serve dual purposes - as practical kitchen tools and stunning wall decorations. You can experiment with different wood types like maple, walnut, or cherry to create varied textures and color palettes.
Spice racks and utensil holders present another opportunity for wooden art. Design a wall-mounted rack with carefully carved compartments or a free-standing holder with intricate geometric patterns. These projects allow you to showcase your craftsmanship while solving kitchen organization challenges.
Decorative Wooden Accessories for Home
Gardeneros recommends exploring smaller wooden art projects that enhance home decor. A wooden jewelry organizer can be an excellent starting point for those new to woodworking. By drilling small holes and adding hooks, you can create a customized display for earrings, necklaces, and bracelets.
Wooden wall art provides another creative avenue. Consider crafting geometric wall hangings using different wood types and stains. Layered designs with varying wood tones can create depth and visual interest. Simple techniques like wood burning or stenciling can add intricate details to these pieces.
Photo frames and floating shelves offer additional opportunities for wooden art. Design frames with unique edge profiles or shelves with subtle curves that break away from traditional rectangular shapes. These pieces can highlight family photographs or display cherished collectibles while serving as art themselves.
Remember that wooden art is about personal expression. Don’t be afraid to experiment with different techniques, finishes, and designs. Each piece you create tells a story and reflects your unique creative vision. Start small, practice your skills, and gradually challenge yourself with more complex projects.
The beauty of wooden art lies in its imperfections and handmade quality. Embrace minor variations in grain, color, and finish - these characteristics make your creations truly one-of-a-kind. With patience and practice, you’ll transform simple wood pieces into stunning artistic expressions that enhance your living spaces.
Step-by-Step Guide to Creating Wooden Wall Art
Wooden wall art transforms empty spaces into personalized artistic expressions. This guide will walk you through creating a stunning piece that reflects your creativity and craftsmanship.
Planning Your Wooden Wall Art Design
Instructables emphasizes the importance of careful design planning before starting your project. Begin by sketching your concept or finding inspiration from geometric patterns, nature scenes, or abstract designs. Consider the dimensions of your wall space and how the artwork will complement existing decor.
Choose a wood type that matches your design vision. Lighter woods like pine work well for bright, modern designs, while rich walnut or oak provide depth for more complex compositions. Select wood pieces with consistent grain patterns and minimal imperfections. If you’re working with reclaimed wood, Instructables recommends carefully inspecting each piece for structural integrity and removing any protruding nails or staples.
Preparing and Assembling Your Artwork
Gather essential tools for your project:
- Measuring tools: Ruler, square, and measuring tape
- Cutting tools: Saw (hand saw or power saw)
- Sanding equipment: Sandpaper or electric sander
- Finishing materials: Wood stain, paint, or protective sealant
- Mounting hardware: Wood glue, screws, or mounting brackets
Start by carefully cutting your wood pieces to the required dimensions. Precision is key - measure twice and cut once to ensure clean edges and accurate fit. Sand each piece thoroughly, beginning with coarse-grit sandpaper and progressing to finer grits for a smooth finish. This preparation ensures your pieces fit together seamlessly and creates a professional-looking final product.
Finishing and Mounting Your Wooden Wall Art
Apply your chosen finish to enhance the wood’s natural beauty. Wood stains can highlight grain patterns, while paint allows for more creative expression. Apply multiple thin coats, allowing adequate drying time between each layer. Consider using a clear sealant to protect your artwork and add a subtle sheen.
For mounting, create a sturdy backing using plywood or a similar stable material. Arrange your prepared wood pieces carefully, using wood glue and small finishing nails to secure them in place. Ensure the artwork is balanced and structurally sound before final installation.
When mounting your piece, use appropriate wall anchors based on the artwork’s weight. Level the piece carefully, using a spirit level to ensure it hangs straight. Consider the artwork’s visual impact - place it at eye level and allow sufficient surrounding space to showcase its design.
Remember that wooden wall art is a personal journey of creativity. Don’t be discouraged by initial challenges. Each project builds skill and confidence. Embrace imperfections as part of the handmade charm, and take pride in creating a unique piece that tells your artistic story.
To help you plan and execute a wooden wall art project, here’s a step-by-step process table summarizing each key phase and its main actions.
| Step | Main Actions |
|---|---|
| Plan Your Design | Sketch concept, decide on style (geometric, nature, abstract), pick wood type, measure wall space |
| Prepare Materials | Inspect/select wood, cut pieces to size, check for flaws or nails (especially with reclaimed wood) |
| Sand and Finish | Sand all pieces (coarse to fine grit), apply stain, paint, or sealant in thin layers |
| Assemble Artwork | Arrange layout, glue/nail pieces to backing, ensure structural soundness |
| Mount and Display | Attach mounting hardware, level on wall, choose optimal placement in room |
With patience and practice, you’ll develop the skills to create increasingly complex and beautiful wooden wall art that transforms your living spaces and reflects your individual style.
Tips for Selling Your Wooden Art Online
Transforming your wooden art hobby into a profitable online business requires strategic planning, marketing skills, and understanding digital marketplaces. By leveraging online platforms and implementing effective selling techniques, you can turn your passion into a sustainable income stream.
Choosing the Right Online Platforms
Etsy remains a premier marketplace for handmade wooden art, offering a dedicated community of craft enthusiasts and collectors. The platform attracts buyers specifically seeking unique, artisan-created pieces. Shopify provides another robust option, allowing creators to build personalized online stores with greater control over branding and customer experience.
Consider diversifying your online presence across multiple platforms. Social media platforms like Instagram and Pinterest serve as powerful visual marketing tools, enabling you to showcase your wooden art’s intricate details and craftsmanship. Create high-quality, well-lit photographs that highlight the unique characteristics of each piece, demonstrating the skill and creativity invested in your work.
Professional Product Photography and Presentation
Photography can make or break your online sales potential. Invest time in creating professional product images that accurately represent your wooden art. Use neutral backgrounds, natural lighting, and multiple angles to give potential buyers a comprehensive view of your creations. Include close-up shots that reveal texture, grain patterns, and fine details.
Write compelling product descriptions that tell a story. Explain the inspiration behind each piece, detail the wood type used, discuss the creation process, and highlight any unique characteristics. Transparency builds trust with potential buyers and helps them connect emotionally with your artwork.
Pricing and Marketing Strategies
Pricing wooden art requires careful consideration of multiple factors. Calculate your costs, including materials, time, tools, and overhead expenses. Research similar products in your market to understand competitive pricing. Don’t undervalue your work - handcrafted wooden art represents significant skill and creativity.
Develop a consistent brand identity across all platforms. Create a memorable logo, use consistent color schemes, and craft a narrative that communicates your artistic philosophy. Engage with your audience through social media, sharing behind-the-scenes glimpses of your creative process, work-in-progress shots, and personal insights.
Consider offering customization options to differentiate your wooden art. Many buyers appreciate personalized pieces that can be tailored to their specific preferences. This approach not only increases your potential customer base but also allows you to command higher prices for bespoke creations.
Understand shipping logistics carefully. Wooden art requires careful packaging to prevent damage during transit. Invest in high-quality packaging materials and consider offering insurance for valuable pieces. Clearly communicate shipping times, methods, and potential international shipping restrictions.
Building an online reputation takes time and consistent effort. Encourage satisfied customers to leave reviews, respond professionally to feedback, and continuously refine your craft. Each sale is an opportunity to build credibility and expand your artistic brand.
Remember that selling wooden art online is more than a transaction - it’s about sharing your passion, creativity, and unique artistic vision with the world. Stay patient, persistent, and passionate about your craft, and success will follow.
Frequently Asked Questions
What types of wood are best for making wooden art?
Hardwoods like oak, walnut, and maple are excellent for intricate pieces, while softwoods like pine and cedar are easier to work with and more budget-friendly for beginners.
What basic tools do I need to start creating wooden art?
Essential tools include chisels, hand saws, gouges, measuring tools, and sanding equipment. Investing in quality tools will improve your precision and safety during projects.
How do I finish and protect my wooden art?
Apply wood stains or paints to enhance the wood’s natural beauty. Use a clear sealant for additional protection against wear and tear, and allow adequate drying time between coats for the best results.
What are some easy wooden art projects for beginners?
Begin with functional decor like cutting boards or spice racks. Decorative projects such as photo frames and wall hangings using simple techniques can also be great starting points.
Transform Your Wooden Art Ideas into Lasting Memories
Love the feeling of bringing a DIY wooden art project to life, but find yourself wishing for greater precision or a truly unique design? As explored in this guide, even with handy tips and basic tools, achieving professional detail and personalized touches can be a challenge. Whether your goal is a customized display piece, a functional kitchen accent, or a special keepsake, you deserve something that stands out and tells your story.

Ready to elevate your next project? At CustomCraft UA, we blend traditional wood artistry with state-of-the-art technology to craft organizational goods, personalized keepsakes, and display stands you will not find anywhere else. Our team in Kyiv works with you on one-of-a-kind creations, transforming your sketches and ideas into handcrafted wooden masterpieces. Explore what is possible and start your custom order today by visiting CustomCraft UA. Your wooden art vision deserves to be realized—let us help you make it happen now.


